Sunday, October 5, 2014

Mexican Rice, a Long Story

Easy Oven Mexican Rice

1 Tablespoon vegetable oil
1/4 cup chopped onion
1 teaspoon minced garlic (1 clove)*
1/2 teaspoon chili powder
1/2 teaspoon ground cumin
1/2 cup uncooked short or medium-grain white rice*
1 cup chicken broth*
2 Tablespoons tomato sauce*


Heat the oven to 350 degrees.

Put the rice into the casserole.  (I use a 1.5 quart Pyrex casserole with a lid)

Heat the oil in a large skillet over medium heat. Add the onion and garlic; cook and stir until onion is translucent.   If the heat is too high, the garlic will burn and taste bitter.  Don't get in a hurry like I do and turn the heat up too much.

Stir in the chili powder and cumin, and cook for about 30 seconds.

Add the chicken broth and tomato paste, and bring to a boil.  Pour over the rice and stir.  Cover with a tight-fitting lid or aluminum foil.

Bake for 35 minutes, or until liquid has been absorbed and rice is tender.


 THE LONG STORY PART

So, I wanted some Mexican Rice to go with the chicken enchiladas.   I found a decent recipe, cooked in a skillet.

It was pretty good, but of course, it made a huge amount, so I tried a half recipe.   Thought it'd be better to use a smaller skillet.   It seemed to be going well until it came time to cover the rice for cooking.   The only skillet  I have with a lid is enormous, so I usually cover the medium-sized one with the lid from my soup pot.   It sits just inside and works as long as the recipe doesn't say a "tight-fitting lid", and it seems like all the lids now have those steam holes in them anyway...

But the lid hung over the edge of the smaller skillet, and I didn't think anything of it... well all the spicy, tomatoey steam condensed on the lid and ran to the edges and dripped out on the stovetop...

The next time I tried a recipe for oven-baked Mexican rice.  I was baking enchiladas anyway, so heating up the oven was no big deal.   It turned out even better!  And with some adjusting, I cut it down to two servings and used medium grain rice, which is more chewy and satisfying and tastes better, too.

When I first moved to Arizona, I couldn't find Silver Pearl rice anywhere.  My mom would bring some when she visited, and later I'd bring some home from California, once I stuffed 5 two-pound bags into my carry-on... But now it's available at Fry's, Hinode brand.    But the once red package of Silver Pearl is now a yellow package of Calrose.  But it's the same rice. 

This makes two GENEROUS servings.  It could be four servings if you were having some beans, too.  Or a salad, or a bunch of lettuce or something...

You will need a skillet and a covered casserole (or a baking dish and some aluminum foil.) 
An ovenproof skillet with a lid would work and save washing a dish...  but keep in mind that rice expands a lot when it cooks.  If the skillet isn't big enough it could get messy... 


*HINTS AND TIPS:

You can use more onion, garlic, or spices if you like.  Maybe throw in some chopped green chiles.  I wouldn't, but you could...

If you don't have chicken broth, use water and  1/2 teaspoon of salt.

I'm too clumsy to mince garlic... it's an invitation to cut my fingers.  So I buy it already minced.  Last time I bought it in a squeeze bottle, so I squeeze out a generous spoonful, probably closer to 2 teaspoons.


An 8 ounce can of tomato sauce has about 14 Tablespoons (it's 8 ounces by weight, not volume).  But.. you can freeze the rest!  Put 2 Tbls into each of six cavities in an ice cube tray and freeze.  Pop them out and store them in a freezer bag.   (I just pour the leftover sauce into the cavities to fill up 6 equally.  I realize not all ice cube trays are the same size, so you might want to measure, at least the first time.)

When using the frozen cubes,  It's best to thaw it out first, but if you forget, just pop the cube into the skillet with the broth, or pour the broth into a glass measuring cup, add the sauce cube, and microwave for a minute.

If you're making enchiladas, put this in the oven first.  It takes me about 10 minutes to assemble the enchiladas, so it works out great.   (They bake for 25 minutes, the rice for 35)

I could take some pictures, but honestly... it's just red rice.   Just eat it.

This is if you make two servings out of the recipe.  Like I said, if you're having beans or salad on the side, it'll make four servings.


Chicken Enchiladas


I always thought enchiladas would be hard to make.  They just look complicated... and messy.

And, I am always wary of recipes that don't give specific amounts.

But as I always say, if I can make this, anyone can!  I call these "Non-Scary Chicken Enchiladas"

I've tried to quantify the recipe as best as I can.  Next time I'll take pictures.

1 cup (about 5-6 ounces) shredded cooked chicken
4 tortillas (8 inch, "soft taco size") flour or corn
1 can (10 ounces) green enchilada sauce
8 ounces shredded cheese (a lot)
Chopped onions, optional
Small can of diced Hatch chiles, also optional.
Sour cream, also optional.
Vegetable oil


Heat your oven to 350 F. Oil up an 8 inch square cake pan.   Lining it with aluminum foil first makes it easier to get the enchiladas out of the pan.

Put the tortillas on a plate and cover with a damp paper towel.  Microwave 30 - 40 seconds until they are soft and pliable.

Pour 1/3 of the sauce into the cake pan.

 Take one tortilla and place about 1/4 cup chicken in the middle.  Spread it out in row.


Drizzle a spoonful of sauce on it, and top with a handful of some cheese.   The cheesier the better, in my opinion. But not so much that it'll spill out the ends. Throw in some diced chiles and onions if you like.

Roll up the tortilla, leaving the ends open.  Place it seam side down in the cake pan.

Repeat with the rest of the tortillas.  The should be nestled together in the pan.


Pour the rest of the sauce over the enchiladas, and top with more shredded cheese.  The tortillas should be pretty well covered by the sauce and cheese.


Bake for 25 minutes, or until the cheese is melted and the sauce is bubbly.


Top with sour cream, if that's you thing.   Green onions are good, too.

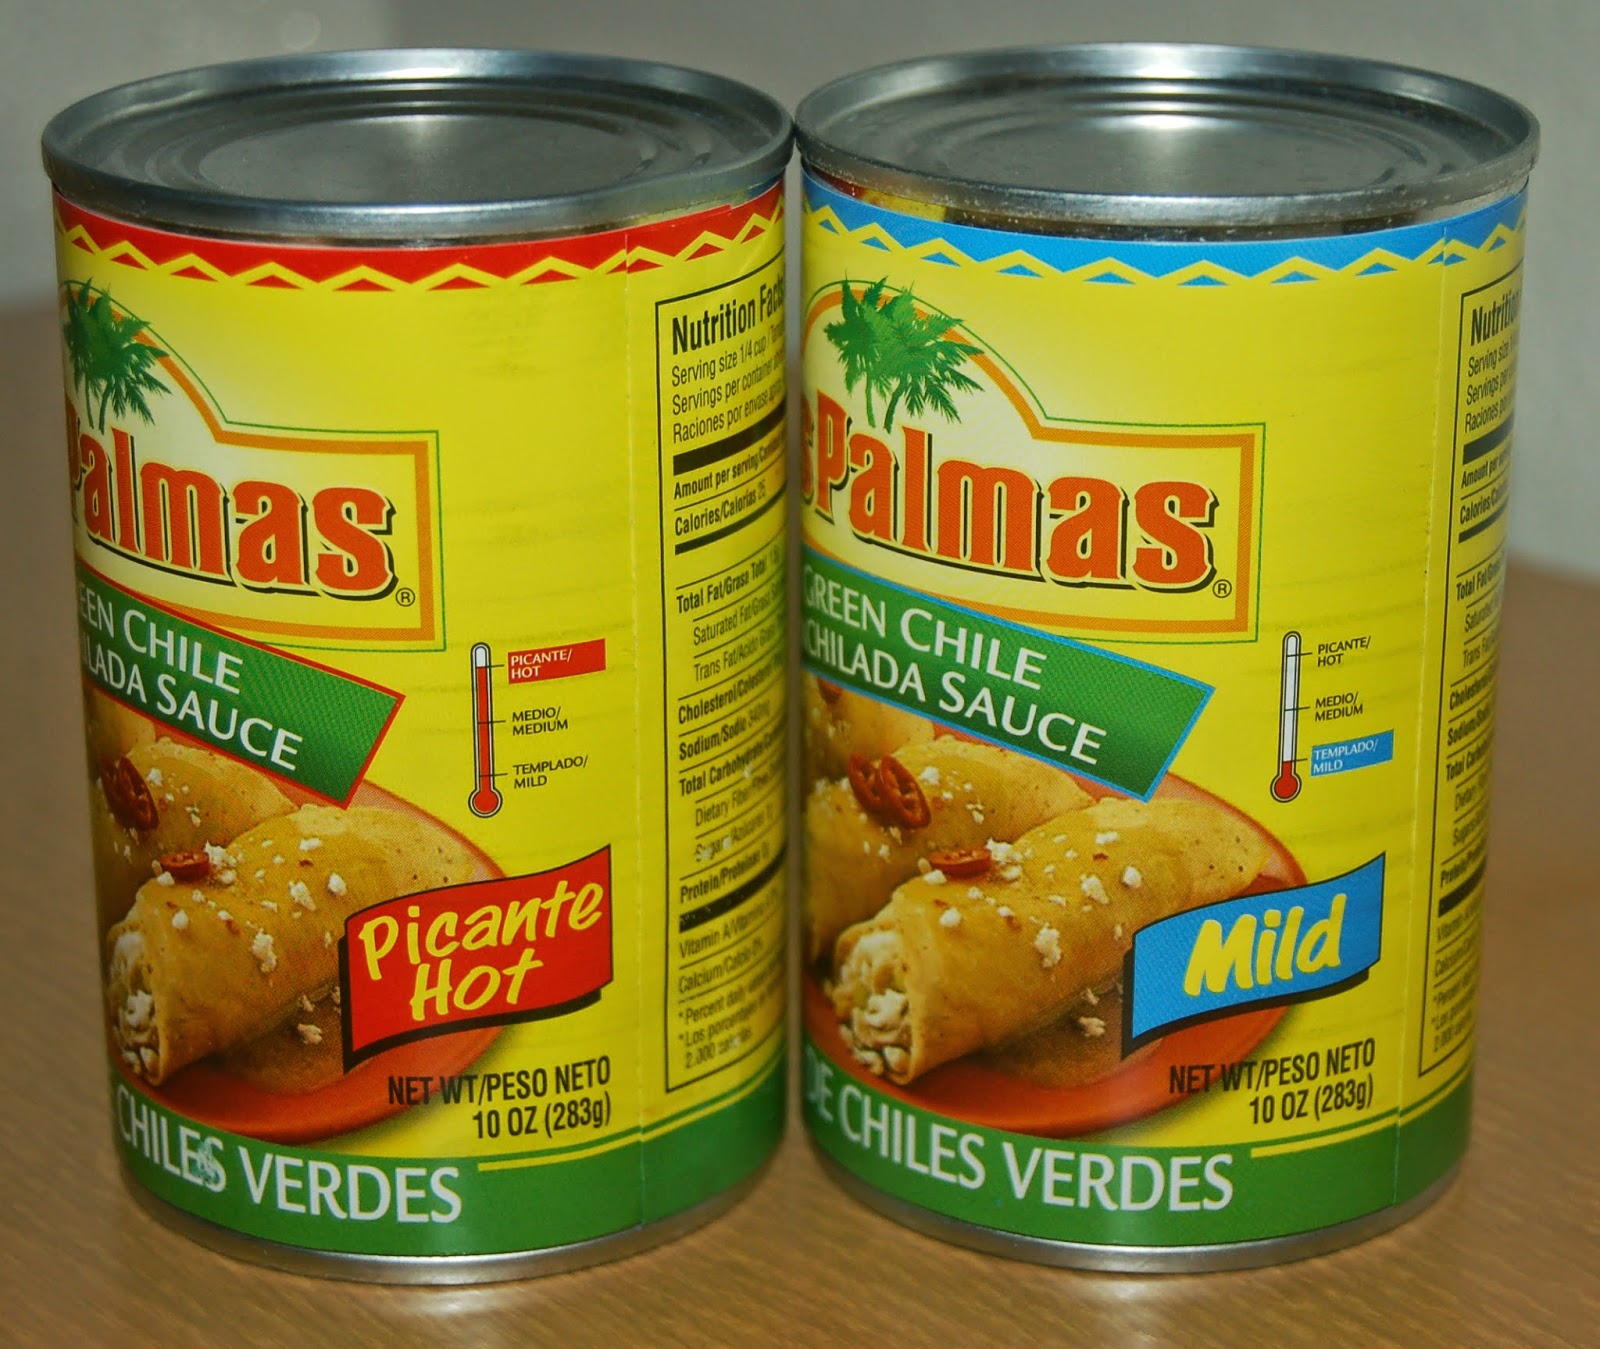
The spice level of this is directly related to the sauce you use.   And sometimes the sauce cans will fool you!  Check these out:


Looks the same when sitting on the shelf...


Fooled you!  There's a medium version, too, which I saw when digging through the cans on the shelf at the store.  Shoppers are such pigs.

Neither is devastatingly hot, but the mild allows you to enjoy the flavor without burning your tongue.

I serve this with Easy Oven Mexican Rice.

Actually, I don't serve it, I pull it out of the oven and say "Food's done!"

Saturday, October 4, 2014

Crock Pot Peach Butter


When we lived in Montana, we used to buy apple butter from the Amish store down the road.  It was so good, and the commercially made stuff just doesn't taste as good.   I never thought about making it myself, but this is Peach Butter! Like apple butter, only better.


Four peaches, two tablespoons sugar, my favorite knife, a cutting board, and wait... what's my corn brush doing in there?  Well, it's soft, and perfect to scrub the peaches with.

I still hate recipes that say things like "4 peaches" because what size of peaches???  Tiny baby ones, or the one that kid James chases around...  So, I went to the Sewing Room of Doom and got the tape measure, and measured these babies around their fuzzy little equators.

They were between 8.5 and 9 inches around.  So, that's your average peach.

Cut the peaches vertically.

Pop out the pit, and use a small spoon to scrape out the icky stuff in the center.  Cut each half in four slices...


Then rotate it 90 degrees and cut four times again.  There's a jar lid in every picture...


Red is not a good color of cutting board to photograph a peach on.  I have a new white one, so better pictures next time.*


Do this for each peach.  Plop them all into the slow cooker, and sprinkle the sugar over the top.


My ancient (20+ years old) crock pot.

After four hours on low, remove the peaches (use a slotted spoon) and put them into a food processor or blender.


My ancient (1985) Lil' Oskar food processor.  I love that thing, and of course they're out of production so if I break it, I lose it.

Rev it up, be careful it's hot! (don't hold your hand over the vent hole in the lid)

Pour the peach puree back into the crock pot, and stir it up with the juices.   Cover, but prop the lid open with a wooden spoon to let the moisture escape.


This is the part that I can't measure or be specific.  The time it needs to cook now depends on how juicy the peaches were.  So, check it  and stir every 30 minutes until it's the consistency you like.   About 1-2 hours.

At this point you can add some vanilla extract if you like, about a teaspoon.  Or maybe two, taste it and see.

Pour into a jar, or other container with good lid.   This is a jelly jar, with my canning funnel in it... saves some mess.  But you don't need it.   Unless you're messy like me.


There's that jar lid again... bet you wondered why it was lying around.

The jars can be processed in hot water to keep in the cabinet, but I'm not crazy about doing that.  I just put one in the fridge and one in the freezer. 

This is so good on biscuits or English muffins.  Or toast.  Or anything.


* There, isn't this better?  I'll be sure to photograph chopping an onion or a potato on one of these...


Dulce de Leche - Easy!!!

Crock Pot Dulce de Leche

You will need:
A crock pot (duh)
3 4-ounce canning jars with lids and rings
1 can (14 oz) sweetened condensed milk
Tongs & a towel

Make sure the jars are clean and dry.

Pour the sweetened condensed milk into the jars.   I started out using my canning funnel, but I really didn't need it.   The milk is thick and doesn't splatter if you pour it carefully.  You'll need a spoon to get it all out of the can.


Make sure the rims of the jars are clean, and close them up tightly.

Place in the crock pot, and add water until the jars are covered to a depth of one inch.  (one inch above the tops of the jars).


Cover and cook on LOW for 6-8 hours. 

Retrieve the jars from the hot water CAREFULLY! I used my canning jar lifter, but you can use tongs.  Set them on a towel and let them cool a few hours.

When the jars are cool, remove the rings, and clean and dry them.  Wipe off the lids, and replace the rings.  If you have hard water like I do, you might want to wipe off the jars with some vinegar.   Or better yet, use distilled water.  At 88 cents a gallon, it's a cheap option, and the jars come out squeeky clean.

If the jars sealed you can keep them in the cabinet, but if not, they should be refrigerated.

Refrigerate after opening, it will last for weeks  (like you won't eat it in a few days).

You'll know your jars are sealed if the center of the lid doesn't spring back when you touch it.   You should also hear a loud pop when the jar seals if you're nearby.

You can heat and soften this by placing the jar in a pan, add water to come halfway up the jar, and heat over medium heat.

Or, you can eat it with a spoon... it's like creamy caramels, but without the risk of losing a filling...


This batch was cooked for 8 hours.  The longer you cook it, the thicker and darker it gets.  Six hours is a little more liquidy than eight.  At ten hours it's pretty thick.

Friday, October 3, 2014

Seasonal Food

Pumpkin Spice Butternut Squash Pecan Pie Zucchini Salad...

There's nothing like food when it's in season.  Olathe corn on the cob, Flathead cherries, California blackberries and grapes.   Oregon blueberries.  Montana huckleberries...

But that's not what this post is about.

This post is to complain about over hyping whatever season we're in!  

So, it's Autumn.. it's time for EVERYTHING to be made out of butternut squash, or taste like pumpkin spice.   Give it a rest already.

No, I don't think "pumpkin spice" anything has pumpkin in it.  It's the SPICE, people.  It tastes like pumpkin pie, which I"m not really crazy about.  Give me pumpkin cake or cookies, maybe muffins.... 

In the summer ,it was all about what to do with your over abundance of zucchini.  I had to go to three stores to find zucchini this year, and at $1.49 a pound, it doesn't seem like there was an over abundance.  I don't grow tomatoes, either.  Possibly because I don't really like tomatoes, not more than an occasional slice on a BLT.

Soon it will be the holiday season, and every restaurant and most of the cooking sites will have photos of pecan pie.  OMG, am I the only person who thinks that looks like it's crawling with BUGS?   Give me Christmas cookies any day.

.....(toddles off to find a pumpkin muffin recipe)


Brownies!!!

Brownies... what's not to love?

Better than a mix, and not any harder. 

Baker's One Bowl Brownies
from Baker's Chocolate


4 squares (1 oz each) unsweetened chocolate
3/4 cup butter
2 cups sugar
4 eggs*
1 teaspoon vanilla
1 cup flour
1 tsp salt
1 cup chopped nuts (Optional, DON'T DO IT!)


Heat your oven to 350°F.

Line a 13×9-inch pan with foil, with the ends of foil extending over sides. Oil the foil (tee hee).

Microwave the chocolate and butter together in a large microwaveable bowl on high for about 2 minutes or until butter is melted. Stir until chocolate is melted and completely combined with the butter.

Stir in sugar.

Blend in eggs and vanilla.

Add flour and nuts and mix well.

Pour into the prepared pan.

Bake 30 to 35 minutes or until a toothpick inserted in the center comes out with fudgy crumbs. (Do not overbake!)

Cool completely. Use foil handles to remove brownies from the pan before cutting to serve.

* if you like your brownies a little more cake-like, use 3 eggs.

Makes 24 brownies.... or so they say, but it really depends on big you cut them.  It could be 48 tiny brownies or one big giant brownie.

I use this recipe with a Wilton Brownie Pan and it fills the 12 pockets perfectly.   Bake for about 20 minutes and then test. If you're using 4 eggs, it may take a little longer. 

This is supposed to be a nonstick pan, but like most non-stick Baking pans, it isn't.  You need to oil and flour the cavities.  Or use Baker's Joy.   Or use my baking pan coating.  But never, never, ever use Pam or any other cooking spray for baking... it will solidify and nothing short of an atomic bomb will get it off.  (I may repeat this in every recipe that involves the oven). Well, an SOS pad will, but you can't use that on a non-stick pan.  Baker's Joy is formulated for baking and doesn't mind-meld with your pan.


Got the matching Brownie Lifter, too... because using a metal knife to loosen the brownies can be very bad...
Yes, it makes 12 and there are only 6 in the picture... because that was yesterday.


Don't need so many brownies?  The old Baker's recipe makes half as much.


Reviews: The Good, the Bad, and the Ugly

Recipe reviews make me crazy, and not just from poor spelling.   I could go on and on... and maybe I will!

First off, if you're going to change more than 10% of the ingredients, then it's a different recipe.   It's OK to post that information as a helpful hint, but don't rate the recipe!   Especially if you've changed it so much it's unrecognizable!   When I was looking for Mexican Rice recipes, I came across one where a woman had added jalapenos, meat, cheese, and a can of black beans.  Lady, that's a freakin' casserole, not a side dish! 

Secondly, don't complain that a recipe that's full of butter and sugar is not healthy.   Didn't you read the recipe first?

Thirdly, and I know that's probably not a real word, don't say you added peppers or hot sauce to something because it was bland.  Read the damn recipe... if there's no spice in it, and you usually dump a ton of spices in your food, then you probably won't like it.

And don't tell me something is made from ingredients I already have on hand.  How do you know what's in my pantry?  If you've got a webcam in there, I'm calling the cops.

"We can all agree...." no, we can't.  You don't speak for me, or anyone else.  People's tastes are different, and you are not the food judge!

My latest pet peeve is "substituted for".   Learn to use this phrase correctly, people!  It means "used instead of!"  So, if you're using lemon instead of vanilla, for example, you are substituting lemon for vanilla, not the other way around.  "I substituted vanilla for lemon" is not only wrong, it's stupid when there's no lemon in recipe.

Am I impatient? Hell, yeah.